What this guide covers
The goal under a kitchen sink is visibility and access to the plumbing, not maximum storage. Map where the pipes, trap, and shutoff valves actually sit, keep that entire zone clear and easy to see, and only then organize what goes in the remaining space. This guide does not cover repairing, moving, or modifying plumbing. If plumbing work is needed, use an appropriately qualified plumber or contact the property manager or landlord as applicable to the home and lease.
Quick plan
- Empty the cabinet and map exactly where the pipes, trap, and shutoff valves sit.
- Keep a clear, visible zone around every pipe connection and valve.
- Store items only in the remaining space, on the sides, not in front of the pipes.
- Keep cleaning products in original, labeled containers and never combine them.
- Include the cabinet in a regular household reset so plumbing access and the cabinet base stay visible.
Measure and check before you buy anything
Constraints table
| Element | Typical space | Access needed | Plumbing/utility visibility | Rental/property note | Use frequency |
|---|---|---|---|---|---|
| Shutoff valve zone | Directly around each valve, both sides | Needs to be reachable in an emergency without moving stored items first | Must remain fully visible and unobstructed at all times | Applies to owned and rented kitchens alike | Rare, but must be instant when needed |
| Trap and drain connection | Directly beneath and around the trap | Occasional visual check | Keep it visible enough that a change or drip is not hidden by stored items | Do not conceal with a solid platform or riser | Include in a regular cabinet reset |
| Side storage zones | Whatever floor space remains outside the pipe clearance | Daily to weekly | Should not require moving items to see the plumbing | None specific, beyond keeping the valve zone clear | High for daily cleaning supplies |
| Door-mounted storage (if used) | Inside face of the cabinet door | Daily | Confirm the closed door does not press stored items against the pipes | Check the product’s surface instructions and the lease before attaching anything; “removable” does not guarantee damage-free removal | High for light, frequently used items |
The decision process, in order
- Empty the cabinet completely and map the plumbing. Note the position of every pipe, the trap, any shutoff valves, and a disposal unit if present, along with the cabinet base’s condition — look for staining, softness, or swelling in the wood, which is worth mentioning to a landlord or addressing before storing anything on top of it.
- Define a keep-clear zone around every plumbing element. This zone should stay fully visible and reachable at all times, with nothing stored in front of it, on top of it, or wedged behind it.
- Identify the genuinely usable space outside that zone. This is often two narrow side zones rather than one large floor area, since the pipe run typically splits the cabinet’s usable footprint. Measure each side zone separately — width, depth, and height to the underside of the sink basin — since the two sides are rarely identical in a typical cabinet.
- Assign items to the side zones by frequency and by chemical compatibility. Daily items go where they are easiest to reach without disturbing the keep-clear zone; anything that should not be stored near another product — see the safety notes below — gets its own separated spot.
- Choose freestanding or door-mounted storage over anything that blocks the pipe view. A slim caddy or a door-mounted rack keeps items accessible without narrowing your view of the plumbing the way a tall, solid bin placed in front of it would. A caddy with a handle can also make it easier to lift the entire side zone out at once during a regular cabinet check.
- Only then, consider a shelf or platform. If you use a freestanding shelf or platform above part of the plumbing zone, keep it removable and do not let it enclose or hide the pipes; confirm it does not interfere with door swing or shutoff-valve access before placing it.
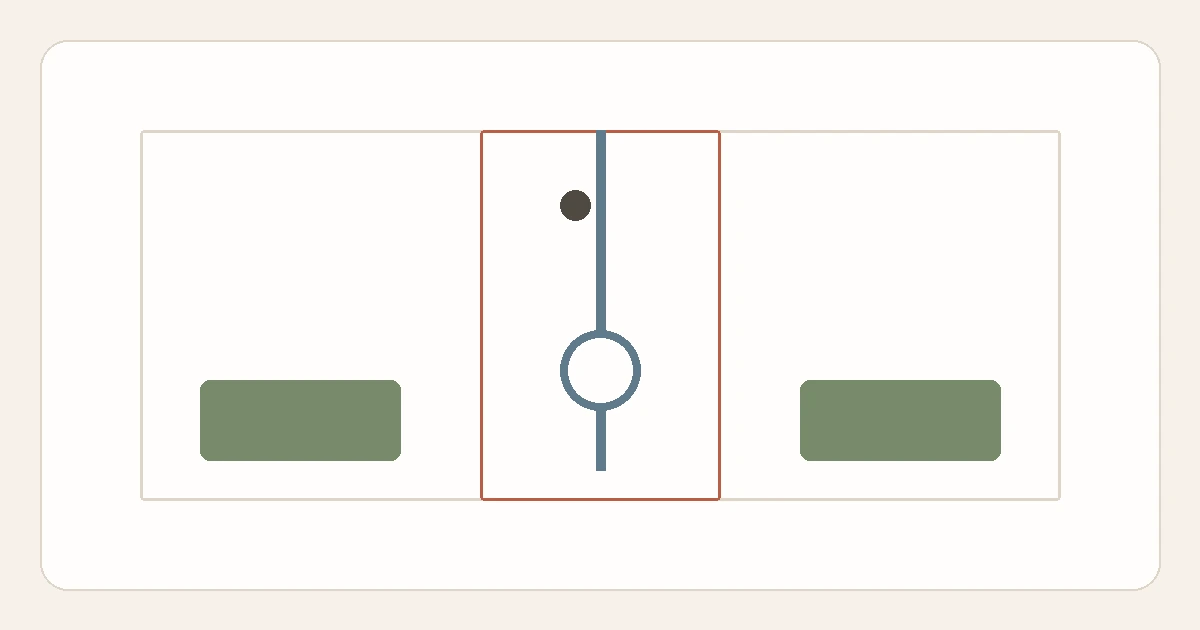
Clearance and leak-visibility diagram
The center zone around the pipe, trap, and shutoff valve stays empty and visible at all times. Storage lives only in the side zones, sized to what genuinely remains once the plumbing clearance is protected.
Under-sink zone checklist
- Every shutoff valve is visible and reachable without moving anything first.
- The trap and pipe connections are visible, not boxed in or wrapped.
- Nothing is stored directly on the cabinet floor beneath the trap.
- Cleaning products stay in their original, labeled containers.
- Incompatible products, such as bleach- and ammonia-based cleaners, are stored apart.
- The cabinet base remains visible enough to notice staining, softness, swelling, or other changes rather than covering them with storage.
- Nothing blocks the door from opening fully.
What not to store or change yet
- Do not store anything directly against or on top of a shutoff valve, even temporarily.
- Do not build or install a solid platform, riser, or full-width shelf that hides the trap and pipe connections from view.
- Do not store bleach-based and ammonia-based products in the same tight zone; keep incompatible cleaning products physically separated.
- Do not move, reroute, insulate, wrap, or otherwise modify any pipe, valve, or disposal unit — that work belongs to a licensed plumber or, in a rental, your landlord.
- Do not decant cleaning products into unlabeled containers; keep each product in the container it came in, with its label intact.
A repeatable reset routine
- During a regular cabinet reset: look over the visible pipe, trap, cabinet base, and valve area, and confirm stored items have not drifted into the keep-clear zone.
- Whenever you buy a new cleaning product: check where it can safely be stored relative to what is already under the sink before placing it, rather than defaulting to whatever gap is available.
- If you notice a leak, drip, unusual odor, or staining: treat that as a signal to contact your landlord or a plumber rather than something to diagnose or address yourself; this guide is not a substitute for a professional assessment of a plumbing or moisture issue.
FAQ
Is it fine to use a small shelf to add a second storage level under the sink?
Often, as long as it is removable, does not fully enclose the pipe and trap area, and does not block the shutoff valve or the door’s full swing. Confirm all three before installing anything.
Should I store trash bags or bin liners under the sink?
Yes, if space allows — these are typically light and low-risk to store near plumbing, as long as they stay in the side zones rather than directly against the trap or valve.
What if my under-sink cabinet has almost no side space at all?
Some cabinets genuinely do not have much room once the plumbing clearance is protected. In that case, consider moving most items to a nearby cabinet elsewhere in the kitchen — see Kitchen Organization for other measurement-led approaches to reassigning kitchen storage — rather than compressing storage into the pipe zone.
Can I childproof this cabinet without blocking plumbing access?
Many childproofing latches mount to the door or frame rather than the interior floor space, so they typically do not interfere with the plumbing clearance; check the specific latch’s own installation instructions to confirm it does not require drilling into or near a pipe run.
Is a lazy Susan or turntable a good fit for this cabinet?
Only if it fits entirely within one side zone without encroaching on the keep-clear area around the pipes; a turntable sized for the whole cabinet floor is usually the wrong shape for a space that has to leave a pipe run untouched down the middle.
Should I line the cabinet floor with a mat or tray?
A shallow, removable tray under the side storage zones can make cleanup easier and help you spot a spill sooner, as long as it does not extend under or around the trap and valve zone, where it could hide an early sign of a drip instead of revealing it.
Method notes
This guide applies the Start Here method guide to the one kitchen zone where visibility matters more than capacity: map the plumbing first, protect a clear zone around it, and only then organize what remains. It deliberately does not include any plumbing repair, modification, or diagnostic instructions, since those require a professional’s judgment about your specific setup. Browse Kitchen Organization for other kitchen storage zones, or see organizing a small apartment without buying more bins for the same measure-first approach applied to other rooms.
Sources
- Occupational Safety and Health Administration and NIOSH, hazard information on mixing cleaning products containing bleach and ammonia — osha.gov/sites/default/files/publications/OSHA3512.pdf
- U.S. Environmental Protection Agency, household hazardous waste storage guidance — epa.gov/hw/household-hazardous-waste-hhw